Mastering Your Small Studio Apartment Layout
That first look at a totally empty studio apartment can be pretty daunting. The real secret to getting a small studio layout right isn’t about the furniture you buy—it’s about thinking ahead and planning before you move a single thing. It’s all about carving out intentional zones for living, sleeping, and eating, turning one open room into a home that actually works.
Thinking Beyond the Box: Your First Layout Moves
Before a single box crosses the threshold, just pause for a moment. You’re not just filling a room; you’re designing a home. This initial planning phase is without a doubt the most important part of making your space feel bigger, flow better, and actually feel like you from day one. It all starts with getting a handle on your space and how you’ll move through it.
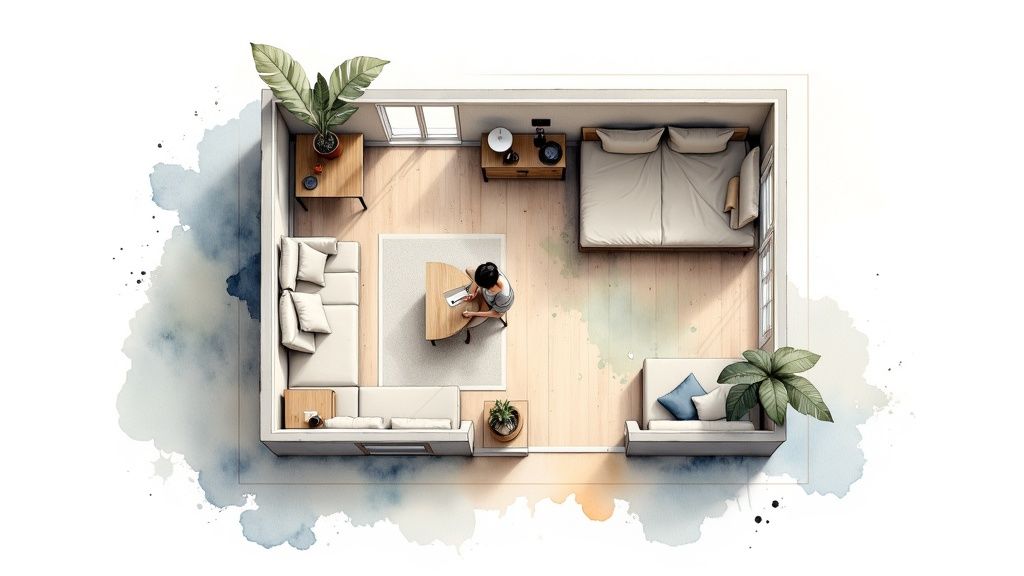
First things first, mentally slice your studio into zones. This is a go-to technique for designers, who often lean on a ‘rule of thirds’ principle. Think of it like this: dedicate about 40% of the space to your living area, 30% to sleeping, and the last 30% to your kitchen and dining spot. This rough division helps create a sense of balance and makes sure each “room” has enough breathing space to function without feeling crammed.
Get to Know Your Non-Negotiables
Every apartment has features that are set in stone. Instead of seeing them as problems, think of them as the starting points for your layout.
- Windows and Natural Light: Where does the sun hit throughout the day? This is almost always the best place for your main living area to keep it feeling bright and airy.
- Outlets and Ports: Go on a scavenger hunt and map out every single outlet. Your desk or TV setup will have to live near them, which can have a domino effect on the rest of the room’s flow.
- Architectural Quirks: Got an awkward nook or a random structural column? Don’t fight it. These can become the perfect home for a cozy reading chair, a compact desk, or a clever storage unit.
Your apartment’s fixed elements—the windows, outlets, and entryways—are not obstacles. They are the foundational clues that will help you solve your unique layout puzzle. Use them as a starting point, and the rest of the plan will fall into place.
Map Your Daily Routine and Traffic Flow
Now, let’s get real about how you actually live. Where’s the first place you walk when you come through the door? What’s the path from your bed to the kitchen for that crucial morning coffee? These pathways, or “traffic flows,” need to stay clear. A classic rookie mistake is shoving a coffee table too close to the sofa, creating a daily shin-banging obstacle course.
As you start piecing the puzzle together, choosing furniture tailored for small apartments is a huge step in making the space both functional and stylish.
Before you get too attached to an idea, grab a piece of paper and sketch out a rough diagram. This doesn’t need to be an architectural masterpiece. Just mark your fixed elements and then draw arrows showing your most-traveled routes. This simple exercise forces you to visualize the space practically. To get better at this, check out our guide on how to create floor plans: https://www.room-genius.com/blog/how-to-create-floor-plans/.
Doing this groundwork first ensures that every piece you eventually bring in has a purpose, creating a layout that feels both open and perfectly organized.
Here’s a quick-glance table to help you allocate space effectively in your studio apartment using the rule of thirds principle for a balanced layout.
Studio Layout Zoning Blueprint
| Zone | Suggested Space Allocation | Key Function | Primary Furniture Piece |
|---|---|---|---|
| Living Area | ~40% | Relaxation, entertaining, daily activities | Sofa or sectional |
| Sleeping Nook | ~30% | Rest, privacy, personal space | Bed (or convertible sofa) |
| Kitchen/Dining | ~30% | Cooking, eating, workspace | Small dining table or island |
Think of this blueprint as a starting point. Your personal needs might mean you need a larger work area or a smaller dining spot, so feel free to adjust these percentages to fit your life. The goal is a layout that feels custom-built for you.
Carving Out Rooms Without Building Walls
The real magic in designing a great studio layout is creating the illusion of separate rooms within one open space. This isn’t about calling a contractor; it’s about smart, strategic division using furniture, lighting, and a bit of creativity. Forget the old cliché of just shoving a massive bookshelf in the middle of the room. We’re going to dive into more sophisticated techniques that define distinct zones for living, sleeping, and working, making your studio feel both spacious and incredibly organized.
This flow chart breaks down the basic process, moving from the big picture down to the finer details.
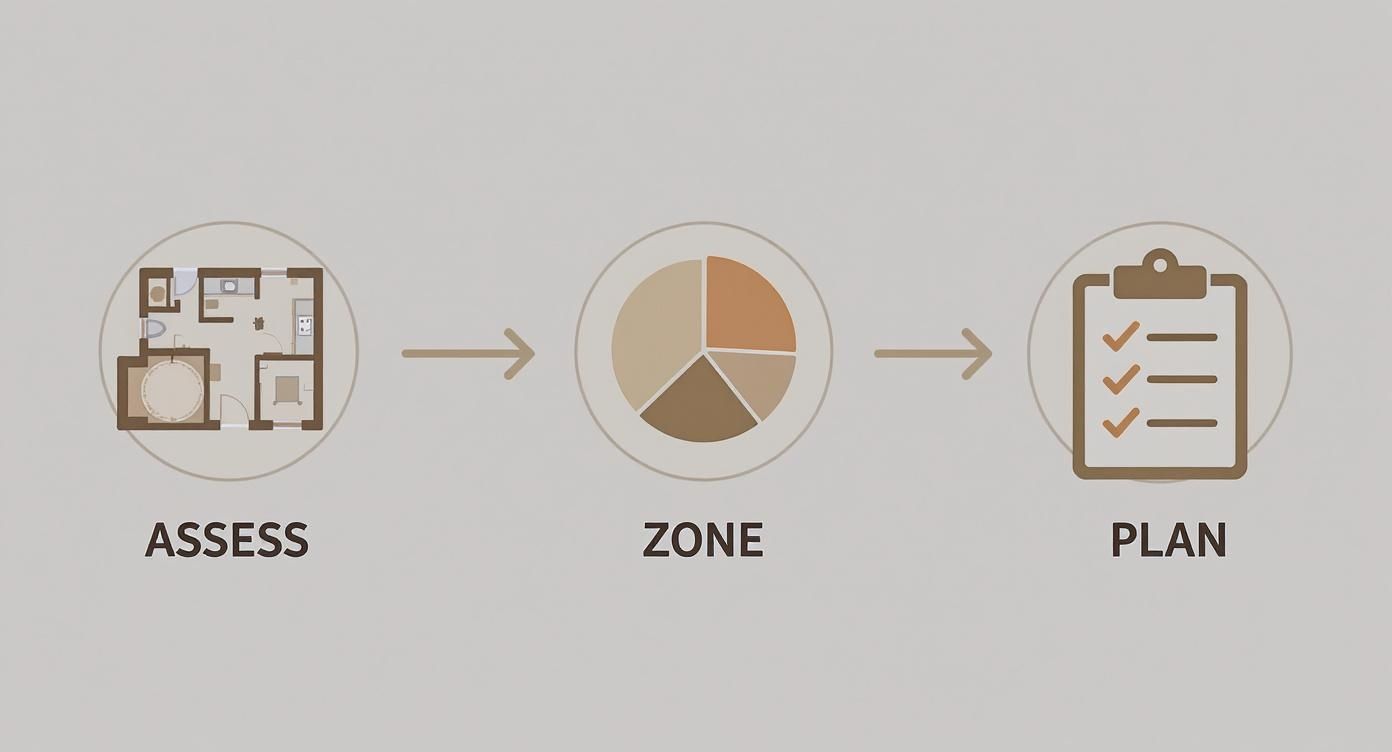
As you can see, a successful layout starts with a solid plan. By moving from a broad assessment of your space to the specifics of zone creation, you ensure every choice you make is intentional and contributes to a functional, cohesive home.
Anchor Your Zones with Rugs and Lighting
One of the easiest—and most effective—ways to define a space is right under your feet. An area rug acts as a powerful visual anchor, clearly marking the boundaries of a specific zone. When your sofa and coffee table are grounded on a distinct rug, your brain automatically reads that as a separate “room.”
Imagine placing a plush, textured rug under your sofa and a small, round jute rug under a bistro table. Instantly, you’ve established a difference between your lounge and dining areas without adding a single bulky piece of furniture.
Lighting is your other secret weapon for creating invisible walls. It can carve out intimate nooks with surprising efficiency.
- Pendant Lights: Hang a low-slung pendant light over a small dining table. The focused pool of light makes that spot feel intentional and separate from the rest of the studio.
- Floor Lamps: A cool arc floor lamp that curves over your main seating area helps contain the “living room,” defining it with both its physical presence and its glow.
- Wall Sconces: Installing sconces on either side of your bed frames the sleeping area, giving it the gravitas of a dedicated bedroom, no walls required.
Let Your Furniture Do the Dividing
How you place your furniture can create natural pathways and barriers that separate functions. This is where you can get really creative with your small studio apartment layout. Instead of pushing everything against the walls—which often makes a studio feel like a long, narrow bowling alley—use your largest pieces to form soft divisions.
A classic move is to “float” your sofa. Pull it away from the wall and position it with its back facing your bed. This creates a surprisingly strong visual separation. The back of the sofa acts as an implied half-wall, clearly marking the line between your public living space and your private sleeping zone. I’ve found this one simple trick is often more effective than a physical screen because it doesn’t block light or shrink the space.
A well-placed sofa does more than just offer a place to sit; it can create a hallway, define the edge of a living room, and act as a headboard all at once. It’s the single most versatile tool for dividing an open-plan space.
You can take this a step further by placing a slim console table behind the sofa. This not only reinforces the “wall” but also adds valuable surface area for a lamp, books, or a place to drop your keys, all without eating up precious floor space.
Create Soft Divisions with Curtains and Screens
For times when you want more tangible privacy, soft dividers are your best friend. They offer a flexibility that permanent fixtures just can’t match. A ceiling-mounted curtain track is a fantastic, renter-friendly solution for sectioning off your bed. You can hang a sheer curtain to create a sense of separation while still letting light filter through, or use a heavier, opaque fabric for total privacy and darkness.
The beauty of this method is its versatility. During the day, leave the curtains pulled back to keep the studio feeling open and airy. At night, draw them closed and your sleeping nook instantly transforms into a cozy, private bedroom.
Decorative folding screens serve a similar purpose. They’re a breeze to move around and can be positioned to hide a messy desk area before guests arrive or to create an intimate corner for a reading chair. The key is to pick dividers that complement your decor, whether it’s a beautifully patterned screen or a curtain in a rich, textural fabric.
Furniture That Does the Heavy Lifting

In a studio apartment, every piece of furniture has to earn its keep. You can’t afford to have items that just sit there and look pretty—every square inch is prime real estate. Think of your furniture less as static objects and more as a team of hard-working problem solvers, each contributing to the flow and function of your small studio apartment layout.
The goal is to find pieces that are as clever as they are stylish. This shift in mindset is crucial, especially as apartment sizes evolve. While the average new studio has been around 545 square feet for the last decade, we’re seeing a growing trend of “micro units” under 400 square feet. This push for efficiency has thankfully fueled some truly brilliant innovations in multi-purpose furniture. You can read more about this trend in this detailed report.
Embrace Multi-Functionality and Convertibility
The absolute foundation of a smart studio is furniture that can pull double, or even triple, duty. These chameleon-like pieces adapt to what you’re doing, transforming your space from a living room to a dining room to a bedroom in just a few seconds.
- The Lift-Top Coffee Table: This is a studio-dweller’s best friend. It’s a coffee table when you’re relaxing, but it easily lifts to become a comfortable dining table or even a standing desk for those work-from-home days.
- Storage Ottomans and Benches: Don’t just get a footrest—get one with a hollow interior. It’s the perfect spot to stash extra blankets, board games, or seasonal items, keeping clutter out of sight.
- Sleeper Sofas and Daybeds: Forget the lumpy pull-outs of the past. Modern sleeper sofas are genuinely comfortable for both sitting and sleeping. Daybeds are another fantastic choice, acting as a couch by day and often featuring built-in drawers or a trundle for extra storage or guest space.
When you choose furniture that can adapt, you are essentially buying more space. A coffee table that becomes a desk saves you from needing a separate work area, freeing up a whole corner of your apartment.
Master Scale and Visual Weight
It’s not just about what a piece does; it’s about how it feels in the space. The concept of “visual weight” is key—it’s how heavy an object appears to be. Lighter, airier pieces can make a room feel significantly larger.
A simple but powerful trick is to get your furniture off the floor. A sofa with tall, slender legs allows light to pass underneath it, creating an illusion of more space. Compare that to a bulky, skirted sofa that sits flat on the ground—it feels like a heavy anchor, visually shrinking the room. The same principle applies to media consoles, bed frames, and side tables.
Always be mindful of proportions. A massive, overstuffed armchair might seem cozy in a showroom, but it will absolutely devour a small living area. Look for furniture with slim profiles and clean lines that are scaled appropriately for your room. If you’re dealing with a particularly tricky layout, you can find some great advice on furnishing an oddly-shaped room.
Go Vertical to Maximize Floor Space
When you can’t build out, you have to build up. Using your vertical space is one of the most effective ways to add storage and make a room feel bigger. By drawing the eye upward, you create the perception of higher ceilings.
Tall, narrow shelving units are perfect for this. They offer a ton of storage for books, plants, and decor without taking up a huge footprint. I’m a big fan of ladder-style bookshelves because their open design feels much less bulky than a traditional bookcase. Wall-mounted floating shelves are another great tool, perfect for holding everything from spices in the kitchen area to toiletries by the bathroom, freeing up that precious counter and floor space.
Ultimately, furnishing a studio is a thoughtful exercise in curation. Every single piece should be a deliberate choice that solves a problem, serves multiple functions, and enhances your layout. When you prioritize smart, adaptable, and properly scaled furniture, you ensure every item is working hard to make your home feel spacious, organized, and uniquely yours.
Design Tricks That Make Small Spaces Feel Big

Alright, your furniture is in place and your zones are mapped out. Now for the fun part—the little bits of magic that make a small room feel anything but. These are the tried-and-true design secrets that play with perception, making your studio feel way bigger and brighter than its actual footprint.
Let’s start with the oldest trick in the book: mirrors. The real secret here isn’t just hanging one up; it’s about where you hang it. The single most effective spot is directly opposite a window. This simple move literally doubles the natural light pouring in, instantly making the whole space feel more open and alive. A big, floor-length mirror leaning against a wall also works wonders, creating a powerful illusion of depth that can make a narrow room feel much wider.
Harness the Power of Light and Color
Your color choices are your secret weapon. In a studio, light and cohesive colors are your best friends. Think shades of white, soft greys, and pale beiges—these colors make walls seem to recede, which gives the entire room a more airy, open feeling.
This doesn’t mean you have to live in a sterile white box, though. You can absolutely bring in personality with accent colors, you just have to be strategic about it. Instead of painting a whole wall a dark, dramatic color (which can make it feel like it’s closing in on you), inject those pops of color through:
- Throw pillows and blankets
- Artwork and interesting objects
- A single, vibrant piece of furniture, like an armchair or a side table
This keeps the overall vibe light while still showing off your style. It’s a popular approach for a reason. One recent report highlighted a massive trend in small-space living, noting a 71% increase in people looking to declutter and organize. It also pointed to a 40% rise in demand for peel-and-stick wallpaper and a 28% jump in “dopamine décor” items. It’s clear people want to personalize their compact homes without overwhelming them. You can discover more about these small-space living trends and see what’s driving the movement.
Elevate Your Space with Smart Details
Beyond the broad strokes of color and mirrors, a few smaller details can really amplify the sense of space. These are the finishing touches that pull your entire small studio apartment layout together.
Layer Your Lighting Never, ever rely on a single, sad overhead light. A well-lit room just feels bigger and more welcoming. You need to layer your lighting to get rid of dark corners and create a warm, inviting atmosphere.
- Ambient Lighting: This is your main source, like an overhead fixture or recessed lights.
- Task Lighting: These are focused lights for getting things done, like a desk lamp or under-cabinet strips in the kitchen.
- Accent Lighting: Think floor lamps or wall sconces that add warmth and a bit of drama.
Maximizing natural light is just as important. Ditch the heavy, dark drapes and go for sheer or light-filtering curtains. They give you privacy but still let that soft, diffused sunlight pour in, which makes any room feel more open.
Get Rug and Art Placement Right A rug can be the perfect anchor for a zone, but the wrong size can make the whole area feel cramped. One of the most common mistakes I see is a rug that’s too small, leaving the furniture looking like it’s stranded on a tiny island. Make sure at least the front legs of your sofa and chairs are sitting on the rug to create a cohesive, grounded look.
When it comes to artwork, hang it a little higher than you might think. Placing art a few inches above the standard eye level draws your gaze upward, creating the illusion of taller ceilings. It’s a simple tweak that makes a surprisingly huge difference.
Finally, remember that good organization is a design element in itself. A clutter-free space is an open space. For more on this, our guide on how to organize a small studio apartment has plenty of practical tips for keeping your home tidy and serene.
Using AI to Visualize Your Perfect Layout
Okay, you’ve got your zones mapped out and a running list of furniture you’d like. Now comes the fun part: bringing it all to life without throwing your back out. Forget pushing a heavy sofa back and forth—modern tech gives you a digital sandbox to test-drive your small studio apartment layout before you move a single thing.
Instead of just guessing how that armchair will look, you can see it. Interior design apps, especially those powered by AI, let you build a virtual model of your studio. You plug in your dimensions, drop in furniture, and play with countless arrangements. It’s a complete game-changer for avoiding frustrating mistakes and getting the plan just right.
From Blueprint to a Realistic Preview
Getting started is surprisingly simple. You’ll begin by feeding your studio’s measurements into the app to create a digital floor plan. From there, it’s a drag-and-drop world. You can pull furniture from huge libraries, resizing pieces to match the exact items you own or have your eye on.
This is where you can answer all those nagging questions that keep you up at night:
- Will I constantly be tripping over that armchair on my way to the kitchen? You can instantly check your traffic flow and make sure you have at least 30-36 inches for your main walkways.
- Can the closet door actually open all the way if the bed is that close? These are the little practical details that digital tools catch before they become real-life annoyances.
- Does that coffee table make my rug look tiny? Visualizing everything together helps you nail the proportions for a balanced, intentional look.
Think of these tools as a flight simulator for your apartment. You get to crash-test all your “what if” ideas and discover brilliant solutions with zero real-world consequences. It’s the best way to feel truly confident in your layout before you commit.
Finding the Right AI Design Assistant
The world of design apps has exploded recently. You can find everything from simple 2D floor planners to incredibly smart AI that can spit out a dozen design ideas from a single photo of your empty room.
Many platforms use AI to not just help with the layout but also to suggest decor styles and furniture that fit your vibe. For a deeper look at what’s out there, our guide on choosing an AI app for interior design can help you pinpoint the best one for your project.
When you’re picking a tool, think about what you really need. Some are fantastic for getting precise floor plans, while others are better for playing with colors, textures, and overall aesthetics. The best ones will let you see your space in 3D, giving you a genuine sense of what it’ll feel like to walk through the room.
To help you get started, here’s a look at a few popular options and what they do best.
Top AI Interior Design Tools Compared
A comparison of popular AI-powered design tools to help you visualize and plan your small studio apartment layout effectively.
| Tool Name | Best For | Key Feature | Pricing Model |
|---|---|---|---|
| RoomGPT | Quick style inspiration | Generates design mockups from a photo | Freemium with credit packs |
| Planner 5D | Detailed 2D/3D floor planning | Extensive furniture library & realistic 3D renders | Free basic plan; paid subscriptions |
| Homestyler | Realistic visualization | High-quality rendering and brand-name furniture models | Free with premium features |
| RoomGenius | All-in-one design and layout | AI-driven style and layout suggestions in one platform | Subscription-based |
Ultimately, picking the right tool comes down to your specific goals, whether it’s getting a quick visual or creating a detailed architectural plan.
Why a Digital-First Approach Wins
Visualizing your layout on a screen does more than just save you from a logistical nightmare. It opens up creative avenues you might never have thought of. You can see in an instant how a round dining table could soften the room’s hard edges or how placing your bed at an angle might create a more interesting flow.
By spending a little time planning on a screen, you can execute your final layout with absolute confidence. This technology empowers you to stop hoping your layout will work and start knowing it will. It’s the final, crucial check that turns a good plan for your small studio into a great one.
Tackling Your Toughest Studio Layout Questions
Okay, so you’ve measured your space and have a few ideas, but now you’re stuck on the tricky parts. This is where the real-world challenges pop up, and even the best plans can hit a snag. Let’s dig into some of the most common questions I hear about studio layouts, from bed placement to those awkward corners that seem impossible to furnish.
Think of this as the troubleshooting guide for your floor plan. We’re moving past the basics and into the specific “what-if” scenarios that can truly make or break your studio’s flow.
What’s the Best Bed Size for a Studio?
This is, without a doubt, the question I get asked most often. And the honest answer is, it depends. While it’s tempting to dream of a king-sized bed, in reality, it will probably swallow your entire apartment whole, leaving you with no room for, well, living.
For most studios under 500 square feet, a Full or Queen bed is the sweet spot. It’s the perfect compromise between having enough room to sleep comfortably and saving precious floor space.
A Full bed gives you an extra 6 inches of width to play with compared to a Queen, and you’d be shocked at what a difference that can make in a tight spot. That said, if you’re sharing the bed, a Queen is usually the non-negotiable choice for keeping the peace.
My Go-To Tip: Opt for a low-profile bed frame. Beds that sit closer to the ground have less visual bulk, which tricks the eye into seeing a taller, more open room. Also, steer clear of chunky headboards that just steal valuable inches.
Where in the World Do I Put My Bed?
Your bed placement is the anchor of your entire layout. Get this decision right, and everything else will start to fall into place. Get it wrong, and you’ll be tripping over furniture for years.
Here are a few strategies I’ve seen work time and time again:
- The Corner Retreat: The classic move. By tucking your bed into the corner farthest from the entrance, you automatically create a cozy, semi-private sleeping zone. This frees up the more central real estate for your living area.
- The Divide and Conquer: Place your bed along a wall and then use something—a tall bookshelf, a decorative screen, or even a curtain—to visually separate it from the rest of the room. This is a brilliant trick for faking the feel of a one-bedroom.
- The Nook Advantage: If you’re lucky enough to have a little alcove or nook, that’s your golden ticket. Placing the bed there feels intentional and keeps your sleeping space from bleeding into your living space.
The one cardinal sin of bed placement? Obstructing a major traffic path. You need a clear line from the front door to the kitchen and windows. A functional space is one you can move through easily.
How Do I Deal With a Weirdly-Shaped Studio?
Let’s be real: not all studios are perfect little boxes. You might be dealing with an L-shaped room, a long and narrow “bowling alley,” or walls with bizarre angles. The secret is to work with the quirks, not against them.
If you have an L-shaped studio, you’ve actually got a head start. Use the smaller part of the “L” as a natural bedroom. The architecture has already done the work of creating separation for you!
For those long, skinny apartments, the worst thing you can do is line up all your furniture against one wall. It just emphasizes the narrowness. Instead, break the room up into a series of zones. Use area rugs and furniture groupings to define a living spot, then a workspace, and finally a sleeping area at the far end. It makes the layout feel much more balanced.
Is a Dining Table Even Possible in a Studio?
Yes, absolutely! You just need to get creative and let go of the idea of a traditional, six-person dining set. It’s all about finding smart, multi-functional alternatives.
Here are a few of my favorite solutions:
- A High-Top Bar Table: A slim, tall table with a couple of stools is incredibly versatile. It can be a dining spot, a standing desk, or a serving area when you have friends over.
- A Drop-Leaf Table: This is a small-space classic for a reason. Keep the sides folded down for everyday use, and then pop them up when you need the extra surface area for dinner guests.
- A Kitchen Island with an Overhang: If you have a kitchen island, see if you can extend the countertop a bit to create a breakfast bar. All you need to do is tuck a couple of low-profile stools underneath, and you’re all set.
By tackling these common layout puzzles head-on, you can transform potential frustrations into clever design choices that make your studio incredibly functional.
Ready to stop guessing and start visualizing your perfect layout? With RoomGenius, you can use AI to generate stunning design options and find the ideal furniture arrangement in seconds. See your studio’s true potential today.