interior design for studio apartment - Small-Space Mastery
At its heart, designing a studio apartment is about making one room do the work of a whole house. It’s a creative puzzle of carving out distinct living zones, picking furniture that pulls double-duty, and using a little visual magic with light and color to make the space feel bigger. The real goal? Make every single square foot work for you, without skimping on comfort or style.
Rethinking the Studio Apartment Experience
Let’s be honest, the old view of a studio as a cramped, temporary stop-gap is completely outdated. Today’s compact apartments can be incredibly smart, efficient, and genuinely beautiful places to live. This guide is all about tackling the biggest challenge of studio life head-on: making a single room function as a bedroom, living room, and kitchen without it feeling like a chaotic jumble.
The secret isn’t just buying smaller furniture. It’s a total shift in how you think about your space. A well-planned studio feels deliberate and calm, not like a compromise. We’ll walk through the foundational ideas that make it all click into place.
Core Principles for Studio Success
A great design always starts with a solid plan. Instead of just pushing furniture against the walls and hoping for the best, a little forethought can completely unlock your studio’s potential. It all comes down to a few key concepts that, when used together, create a home that feels both cohesive and wonderfully livable.
Here are the pillars we’re going to build on:
- Strategic Zoning: This is how you create “rooms” without walls. We’ll use things like area rugs, shelving units, and furniture placement to clearly define where you sleep, eat, and relax.
- Clever Furniture Selection: Think beyond aesthetics. The right pieces need to be perfectly scaled for the room and serve multiple functions—like a storage ottoman that’s also a coffee table, or a dining table that can shrink down to a console.
- The Power of Illusion: We’ll dive into how to use mirrors, smart lighting, and the right paint colors to make your apartment feel brighter, more open, and way more spacious than its actual footprint.
- Personalized Curation: Clutter is the enemy of a small space. It’s all about editing what you own and displaying only what you truly love, turning everyday items into part of your decor.
The real magic in studio design happens when you stop seeing the limitations and start seeing the possibilities. Every corner is an opportunity to add function and personality, creating a home that is uniquely yours.
This mindset is becoming more and more common as city living evolves. The global interior design market is absolutely booming, projected to hit $175.74 billion by 2030, and a huge part of that growth is driven by the need for smarter small-space solutions.
In fact, many of the best techniques come from the world of real estate. Learning how to stage a home for selling is all about maximizing a home’s appeal and creating a sense of spaciousness—exactly what we’re after. The goal here is to show you that a luxurious and highly functional studio isn’t just a dream; it’s completely achievable with the right strategy.
Creating Smart Zones in a Single Room
Let’s be honest, the biggest challenge in a studio apartment is making one room feel like a whole home. The secret? It’s all about zoning. Without walls, you have to get clever and create distinct areas for living, sleeping, and eating. This isn’t just about organizing furniture; it’s about creating psychological boundaries that make your space feel more intentional and a lot less like a single, chaotic box.
The trick is to define these zones without sacrificing that open, airy feeling you probably love about your studio. You’re essentially drawing invisible lines on the floor, creating a natural flow that guides you from one “room” to the next.
Before you move a single thing, take a look around. Where does the best morning light hit? What’s the most natural path from your front door to the kitchen? Thinking about your daily rhythm first will help you place each zone in a way that just feels right.
Anchor Your Space with Area Rugs
One of the easiest and most effective tricks in the book is using an area rug. A well-placed rug can instantly create an island for your living area, clearly separating it from everything else. It grounds your sofa, coffee table, and chairs, visually declaring, “This is the spot for relaxing.”
Think about it: an 8x10 rug slid under the front legs of your sofa and a coffee table immediately defines that patch of floor as the living room. Anything off the rug belongs to another zone. It’s a simple move, but it brings an incredible sense of order.
Use Furniture as Smart Dividers
Your furniture can do more than just sit there—it can be a powerful tool for creating separation without blocking light and killing the vibe. It’s all about being strategic with every single piece.
Here are a few ways I’ve seen this work beautifully:
- The Open Bookshelf: An open-backed étagère is a designer’s best friend in a studio. Stick one between your bed and sofa, and you’ve created a cozy bedroom nook while still letting light stream through. No one feels boxed in.
- The Sofa and Console Combo: Turn your sofa’s back to your sleeping area and slide a slim console table right up against it. Boom—you have an instant barrier that doubles as a drop-zone for keys and mail or a spot for a stylish lamp.
- The Strategic Bench: A low bench at the foot of your bed is a subtle but effective cue. It signals the end of your sleeping zone and the start of your living space, plus it’s a handy spot to sit or toss pillows.
If you’re looking for more ways to arrange your pieces, checking out different room layout ideas can spark some great inspiration, especially for those awkward L-shaped or long, narrow studios.
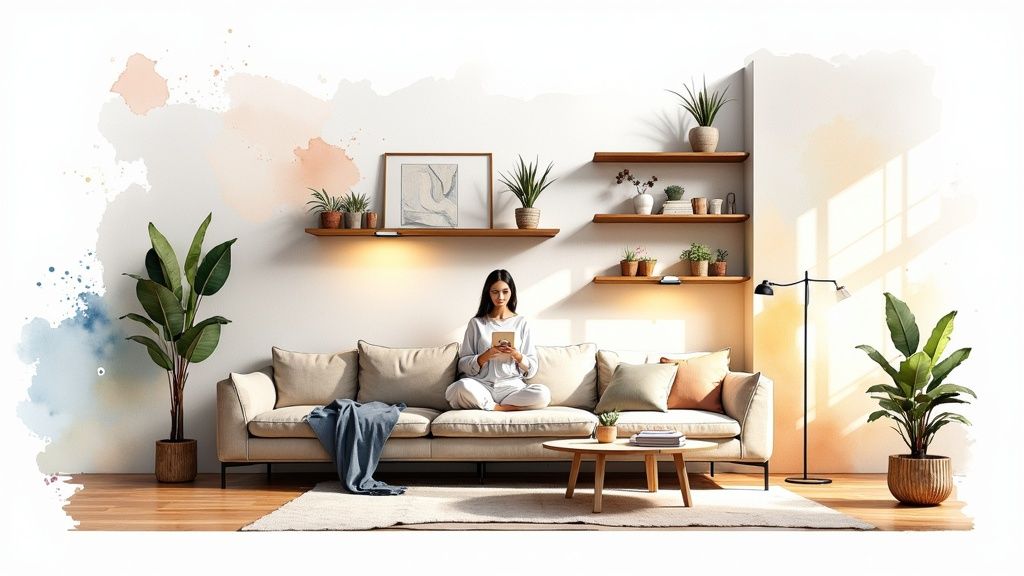
Here’s a perfect example from RoomGenius. The AI-generated design instantly shows how a zoned studio can look, using furniture to carve out distinct living and sleeping areas.
See how the rug anchors the seating area? And the bed is neatly tucked away, creating its own private, cozy quarter. That’s zoning done right.
Plan for Your Studio’s Unique Shape
No two studios are the same. A long, skinny “bowling alley” space needs a totally different game plan than a perfect square or an L-shaped unit. Your layout is your guide.
For a classic rectangular studio, think in a line: place the living area by the windows to catch the light, put a small dining setup in the middle, and tuck the bed into the farthest, darkest corner for a bit more privacy. If you’re lucky enough to have an L-shaped space, that little alcove is practically begging to become a bedroom or a focused home office.
The key is to work with your apartment’s architecture, not against it. Use its quirks to your advantage to create zones that feel intentional and enhance the overall flow of your home.
Ultimately, great zoning is like drawing a functional map for your life within four walls. By using rugs and clever furniture placement to define each activity, you’re building a home that truly supports everything you do—from hosting friends to sleeping soundly.
Choosing Furniture That Works Harder
When you’re designing a studio apartment, your furniture can’t just be pretty. Every single piece needs to pull its weight. Forget the standard advice you’ve heard a dozen times; we’re going beyond just getting a futon. We’re talking about curating a team of high-performing, multitasking pieces that truly earn their spot in your home.
Think of it this way: every item you bring into your studio should serve at least two purposes. Three is even better. This mindset forces you to be incredibly intentional with your choices, ensuring everything adds function and flexibility, not just clutter. The aim is to create a space that morphs with your needs—effortlessly shifting from a lounge to a dining area or home office.
The Art of Multifunctional Furniture
Let’s upgrade our definition of “multifunctional.” A sofa bed is a decent starting point, but today’s market is full of incredibly clever designs that solve multiple small-space problems at once. One of the best investments you can make is in well-designed space-saving fold-out couch beds.
Beyond the bed, here are a few other smart additions I always recommend:
- The Lift-Top Coffee Table: This is an absolute game-changer for studio living. It looks like a normal, stylish coffee table, but then it elevates to become a perfect work-from-home desk or a dining table for two.
- Modular Sofas: Instead of a single, bulky couch, a modular sectional gives you options. You can break it apart into smaller loveseats, create a chaise lounge, or use an ottoman section as extra seating when you have company.
- Sleek Storage Ottomans: These are non-negotiable. A beautiful upholstered ottoman can be a footrest, a coffee table (just pop a tray on top), extra seating, and, of course, a hidden spot for stashing blankets, board games, or remote controls.
The best furniture in a studio doesn’t just sit there—it transforms. It’s about choosing pieces that are as dynamic and adaptable as your lifestyle demands them to be.
The design world has caught on. Minimalist, multifunctional, and space-saving furniture is a huge trend, and for good reason. For a deeper dive into all the different options out there, exploring a comprehensive guide on furniture types and styles can help you pinpoint the perfect items for your unique space.
To help you decide, here’s a quick comparison of some of the hardest-working pieces for a studio.
Multifunctional Furniture Comparison for Studio Apartments
| Furniture Type | Primary Function | Secondary Function(s) | Best For |
|---|---|---|---|
| Lift-Top Coffee Table | Coffee Table | Dining table, workspace/desk | Creating a dedicated work or dining spot without a separate table |
| Sofa Bed/Daybed | Seating | Sleeping area for owner or guests | Combining the living and sleeping zones into one functional area |
| Storage Ottoman | Footrest/Seating | Coffee table, hidden storage | Hiding clutter like blankets, magazines, or electronics |
| Nesting Tables | Side Table | Extra surface area, can be spread out for guests | Flexible surface space that can be tucked away when not in use |
| Modular Sectional | Seating | Reconfigurable layouts, guest bed, separate seating | Adapting the living area for different social situations |
Choosing the right combination from this list can completely change how your studio functions day-to-day.
Understanding Visual Weight
Function is one thing, but how a piece of furniture looks in your space is just as important. This brings us to the concept of visual weight. It’s not about how many pounds an item is, but how heavy it feels to the eye. A bulky, dark-colored sofa that sits right on the floor can feel like an anchor, dragging the whole room down and making it seem smaller.
On the other hand, a sofa of the exact same size but raised on slender legs feels lighter. Why? Because you can see the floor underneath it. This simple trick creates an illusion of spaciousness and lets light and air flow more freely.
Apply this principle everywhere:
- Tables: Go for glass or acrylic. Their transparency makes them practically disappear, taking up zero visual real estate.
- Chairs: Look for dining chairs with slim legs or open-back designs.
- Shelving: Choose open-backed bookcases or floating shelves instead of heavy, closed-in units.
By selecting furniture with a lighter visual weight, you can pack your studio with all the function you need without it ever feeling crowded.
This flow diagram shows how you can use key pieces of furniture to act as anchors that define your different zones, all while keeping visual weight in mind.
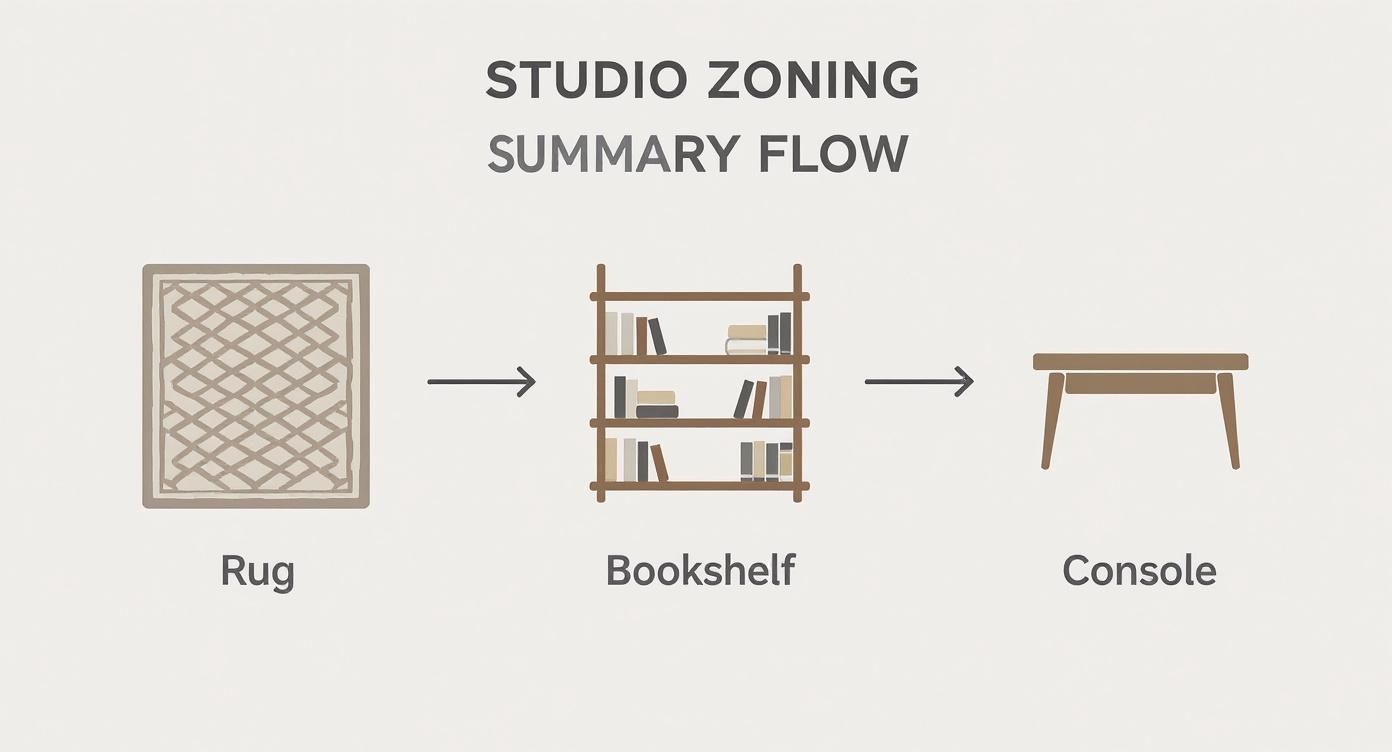
As you can see, starting with a rug, then adding a bookshelf and a console, helps create a logical flow and organization for the space.
Smart Placement Strategies
Where you put your furniture is just as critical as what you buy. So many people make the mistake of pushing everything up against the walls. It seems logical, but it often creates a weird, empty void in the middle of the room—the opposite of cozy.
Instead, try “floating” your furniture. Even pulling your sofa a few inches away from the wall can create a sense of breathing room. Another trick I’ve used in projects is to tuck the bed into a corner. This can free up a surprising amount of central floor space, making the entire studio feel larger and easier to navigate.
From there, you can find clever overlaps. For instance, a narrow console table against the wall opposite the bed can double as a media stand for a TV and a small workspace. It’s all about making every square inch count.
This is where planning tools come in handy. In fact, a staggering 80% of interior designers now use 3D modeling software to map out a space before a single piece of furniture is moved. You can do the same with a platform like RoomGenius, which lets you play with different layouts to find the perfect spot for everything before you commit.
Using Light and Color to Create Space
When you’re designing a studio, light and color are far more than just decorative afterthoughts. They’re your secret weapons for making a small space feel open, airy, and much larger than it really is. It’s all about creating an illusion—tricking the eye into seeing a room that feels brighter and more expansive than its actual square footage.
And let’s get one thing straight: you don’t have to paint everything stark white. While light colors are a classic go-to, a thoughtfully chosen palette can add depth and personality without cramping your style. The aim is an inviting, expansive space, not a sterile white box.
Harnessing the Power of Color
The right color on the walls can completely change the vibe of your studio. Light, neutral colors are popular for a good reason—they’re fantastic at reflecting light. Think soft whites, pale grays, or warm beiges. These shades create a seamless visual canvas that makes the entire room feel more cohesive and spacious.
Another brilliant trick is to go monochromatic. Using different shades and tints of a single color across your walls, furniture, and textiles creates a serene, unified look. This cohesion is key to preventing the visual clutter that can make a studio feel cramped. If you’re new to this idea, our guide on how to choose color schemes is a great place to start.
But don’t be afraid to go bold. A single, dramatic accent wall can work wonders.
Try painting the wall farthest from the entrance a deep, moody color like navy or charcoal. The dark color visually recedes, tricking the eye into thinking the room is longer and deeper than it is.
This simple technique adds a layer of sophistication and proves that you can make bold choices even in a small footprint.
Mastering Layered Lighting
Please, don’t fall into the trap of relying on a single, harsh overhead light. It’s one of the most common mistakes I see, and it casts unflattering shadows that make a room feel flat and uninviting. The solution is layered lighting, where you combine different light sources to build a warm and functional atmosphere.
Think of it in three simple layers:
- Ambient: This is your room’s main light source, like a ceiling fixture or track lighting. I always recommend installing a dimmer switch for total mood control.
- Task: This is focused lighting for specific activities. A sleek floor lamp for your reading nook, under-cabinet strips in the kitchen, or a desk lamp for your work area are all non-negotiables.
- Accent: This is where you have some fun. Accent lights highlight things you love, like a picture light over artwork or a small, stylish lamp on a bookshelf.
By combining these three layers, you get rid of dark corners and guide the eye around the space, adding dimension and warmth. Your studio will feel less like a single box and more like a collection of thoughtfully designed zones.
Strategic Use of Natural Light and Mirrors
Maximizing natural light is absolutely crucial. Sunlight instantly breathes life into a room, making it feel more spacious and alive.
If you’re lucky enough to have good windows, keep the treatments light and simple. Sheer curtains are a fantastic choice because they offer privacy without blocking that beautiful, diffused sunlight. And whatever you do, avoid placing bulky furniture directly in front of a window. Let that light pour in.
Finally, let’s talk about the oldest trick in the designer’s handbook: mirrors. They still work like magic. A large, well-placed mirror can dramatically alter your space.
Try placing a large wall mirror or a floor-length one on the wall opposite your main window. It will capture the natural light and bounce it all around the room, essentially doubling your light source while creating a powerful illusion of depth. It’s a simple move with a massive impact.
Mastering Storage and Personal Style
https://www.youtube.com/embed/Jhtw1gjaaN8
Once your layout, lighting, and furniture are locked in, it’s time for the final layer—the one that really turns a functional studio into your home. This is where clever storage and personal style come together. The goal isn’t just to hide your stuff; it’s about making your storage solutions a seamless, even beautiful, part of the overall design.
Successful studio storage is all about thinking vertically. When floor space is your most valuable asset, the only way to go is up. This little trick also draws the eye upward, creating an illusion of height and space while carving out much-needed room for your belongings.
Go Vertical With Smart Storage
Forget those bulky, floor-hogging cabinets. The best storage in a studio apartment feels light and intentional, adding character instead of just eating up square footage.
Here are a few of my go-to strategies:
- Floating Shelves: These are fantastic. You can display curated decor, books, or a few plants without the visual weight of a traditional bookcase. They just seem to float on the wall.
- Floor-to-Ceiling Bookcases: A tall, slender bookcase can become a stunning architectural feature. If you paint it the same color as the wall, it’ll blend right in, giving you a custom, built-in look that feels incredibly high-end.
- Wall-Mounted Desks: Need a workspace? A desk that folds down from the wall or a slim, wall-mounted shelf can do the job without taking up a permanent footprint.
These vertical solutions free up the floor, making your studio feel more open and much easier to move around in. You’re essentially turning unused wall space into a functional and stylish asset.
Master the Art of Concealed Storage
Let’s be real—not everything you own is pretty enough to be on display. For the everyday clutter, the secret is to hide it in plain sight with storage that doubles as decor. This is where you can get creative and blend pure function with your personal taste.
Think about the hidden real estate in your apartment. The space under your bed is gold. Instead of just shoving things under there, get some stylish, low-profile storage bins or drawers on wheels. If you choose containers that match your bedding, the whole look will feel cohesive and intentional.
Your home should be a collection of what you love, not just a storage unit for your possessions. The key is to be a ruthless editor—display what brings you joy and elegantly conceal the rest.
Decorative baskets are another one of my favorite tools. A beautiful woven basket tucked in a corner can hold extra blankets, while smaller, lidded boxes on a shelf can neatly hide chargers, remotes, and cables. The result is a space that feels calm and curated, not chaotic.
This focus on creating beautiful, functional living spaces has fueled some massive growth in the design world. In fact, the interior design services market is on track to hit $186.61 billion by 2030. A big part of that is driven by the unique challenges of urban living and small apartments. More people are seeing the value in smart design, and you can explore more about these trends and their impact on the industry.
Styling Your Studio Without the Clutter
Now for the really fun part: adding your personality. The single biggest mistake I see people make in a small space is trying to display too many things at once. A lot of small decorative items can quickly make a room feel cluttered and visually “loud.” The key is curation.
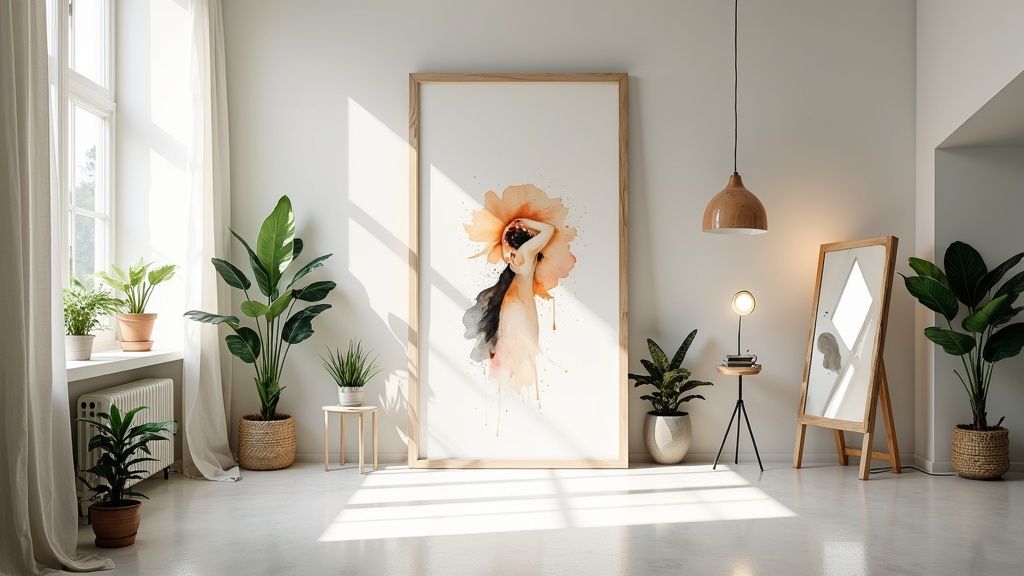
Instead of a busy gallery wall of tiny frames, go for one large, impactful piece of art. A single, oversized painting or a stunning photograph acts as a powerful focal point without overwhelming the room. It draws the eye and makes a confident statement.
Plants are another non-negotiable for me. They add life, color, and a touch of nature that can make any space feel more vibrant and welcoming. A tall fiddle-leaf fig in a corner or a few trailing plants on a high shelf adds that crucial vertical interest and even helps purify the air.
The Power of a Thoughtful Edit
Ultimately, great studio design comes down to a thoughtful editing process. You have to be selective about what you bring into your home and what you choose to put on display.
I always tell my clients to follow a simple rule: if it isn’t beautiful or useful, it probably doesn’t belong here. This mindset is the secret to maintaining a clean, uncluttered look that feels both personal and peaceful. By combining smart, vertical storage with a curated approach to decor, you’ll create a studio that’s not just highly functional, but a true reflection of you.
Answering Your Top Studio Design Questions
Even when you’ve got a solid plan, a few tricky questions always seem to pop up when designing a studio. These are the practical, real-world problems that can stop you in your tracks if you’re not ready for them. Let’s tackle the most common hurdles I see people face.
Think of this as the FAQ section you actually need—the one that bridges the gap between a studio that just works and a space you absolutely love coming home to.
How Can I Create Privacy in a Studio Without Walls?
This is the big one, the question I get asked more than any other. Thankfully, you don’t need to build walls to create a sense of separation. The trick is to create a visual boundary that doesn’t completely block light or make the apartment feel closed off.
An open-backed bookshelf is a classic for a reason. It masterfully divides a room, gives you much-needed storage, and still allows sunlight to filter through. For something more adaptable, a beautiful folding screen is a fantastic choice. You can reposition it, fold it away, or use it to hide your sleeping area when guests are over. Another great option is a ceiling-mounted curtain track—it adds a bit of softness and drama, and you can pull the curtain back to completely open up the space.
What Is the Biggest Mistake in Studio Apartment Design?
Hands down, the most common mistake is picking furniture that’s simply too big for the space. A huge, overstuffed sofa will instantly make a studio feel cramped and claustrophobic. You have to measure everything—your room and the furniture you’re considering. Also, think about visual weight. A couch on slender legs will always feel lighter and less imposing than a blocky one that sits right on the floor.
A close second is bad lighting. Just relying on that one overhead light fixture is a recipe for a dreary space with harsh shadows. You need to layer your lighting. Combine ambient (overall), task (for reading or cooking), and accent lights to create a warm, inviting atmosphere. And please, don’t forget to use your vertical space! It’s a massive missed opportunity for storage and for drawing the eye upward, making the room feel taller.
The best studio designs aren’t about having less stuff; they’re about making every single piece work harder. Get the scale, light, and storage right, and you’ve won half the battle.
Is a Dedicated Dining Area Possible in a Small Studio?
Absolutely, you just have to think outside the traditional dining room box. Forget the big table and six chairs. Instead, look for clever, adaptable pieces. A drop-leaf table is a studio-dweller’s best friend. It can sit against a wall as a console table most of the time, then expand to seat two or even four when you need it.
Another smart move is a high-top table with a couple of stools. This setup has a tiny footprint and can easily double as extra kitchen prep space or a standing desk. And if your kitchen has a peninsula or island, you’re in luck—just add a pair of stylish bar stools, and you have an instant dining spot.
How Do I Show My Style Without Creating Clutter?
In a small space, you have to be a ruthless editor of your own stuff. A bunch of small knick-knacks will just look messy. The key is to be intentional and focus on fewer, but more impactful, pieces.
- Go Big with Art: Instead of a gallery wall of tiny frames, hang one oversized piece of art. It creates a powerful focal point without the visual noise.
- Use Functional Decor: Let your beautiful items also be useful. A gorgeous throw blanket, unique bookends, or a cool ceramic utensil holder all add personality while serving a purpose.
- Stick to a Palette: A consistent color scheme is your secret weapon. It ties the whole space together, making it feel cohesive and thoughtfully designed, not random and cluttered.
Ready to stop guessing and start seeing what your studio could look like? These strategies will get you on the right track, but RoomGenius can bring your vision to life in seconds. Just upload a photo of your current space, and our AI will generate incredible redesigns, complete with furniture suggestions that actually fit your style and dimensions. Plan your dream studio with total confidence by visiting RoomGenius today.