How to Organize a Small Studio Apartment & Maximize Space
Organizing a small studio apartment isn’t about magic formulas; it’s about a smart, practical approach. I always tell people to start with three core ideas: declutter with purpose, create distinct zones for your life, and think vertically. Master these, and you’ll transform a single room into a fully functional home without ever needing to knock down a wall.
A Practical Blueprint For Small Space Success
Standing in an empty studio can be daunting. Where does the bed go? Where do you eat? But trust me, a great home isn’t about square footage—it’s about strategy. The trick is to view the limitations not as problems, but as opportunities for clever design. This isn’t just about tidying up. It’s about building a system that carves out separate areas for living, working, and sleeping, all within the same four walls.
This way of thinking is catching on. A 2023 analysis from Taskrabbit revealed a 10% increase in people moving into studios and a massive 71% jump in folks clearing out clutter to make their smaller homes work better. It’s a clear sign that people are getting smarter about how they live, often driven by the need to make every inch count.
I’ve put together a quick-start framework that breaks down these core principles into actionable steps. Think of it as your high-level game plan before you dive into the details.
Studio Organization Quick Start Framework
| Principle | Key Action | Why It Works |
|---|---|---|
| Declutter with Purpose | Sort everything into Keep, Donate, or Toss piles. Be ruthless. | Creates a clean slate and ensures you’re only storing what you actually need and love. |
| Zone Your Space | Use rugs, furniture, and even lighting to define your living, sleeping, and work areas. | Gives each part of your home a clear purpose, reducing visual chaos and making the space feel larger. |
| Think Vertically | Install floating shelves, tall bookcases, and wall-mounted organizers. | Lifts storage off the floor, freeing up valuable square footage and drawing the eye upward. |
This table really just scratches the surface, but internalizing these three actions is the first step toward a studio that feels organized and intentional, not cramped.
The Core Pillars Of Studio Organization
Let’s dig a little deeper into those foundational ideas. Getting these right from the start will make everything else fall into place.
-
Intentional Decluttering: This is your non-negotiable first step. I can’t stress this enough: before you buy a single storage bin, you have to get rid of what you don’t need. It’s about making conscious choices about what deserves a spot in your home. If you’re looking for a solid starting point, guides on how to downsize your home for a simpler life offer some fantastic strategies.
-
Smart Zoning: When you don’t have walls, you have to create them visually. A well-placed rug can anchor your living area, a bookshelf can act as a soft divider for your bedroom, and a specific light fixture can define your dining nook. This gives every part of your studio a job, preventing that feeling of one big, chaotic room.
-
Vertical Thinking: Your walls are your best friend in a small space. When you can’t build out, you have to build up. This is where you get creative with shelves, tall and slender bookcases, and wall-mounted storage to get things off the floor.
A well-organized studio apartment feels intentional. Every item has a purpose and a place, which transforms a cramped room into a comfortable and efficient home.
Once you master these concepts, you’ll stop wishing for more space and start seeing the potential in what you already have. This strategic approach is also the perfect foundation for the fun part—decorating! In fact, you can see how organization and design work together in our guide on how to decorate small spaces.
Reclaim Your Space Through Intentional Decluttering

Before you even think about buying a single storage bin or a clever piece of furniture, the most important step is to declutter. This isn’t just a quick tidy-up. It’s about being ruthless and intentional about what truly deserves to take up residence in your limited square footage. Real organization starts with subtraction, not addition.
This isn’t just a nice idea; it’s a modern necessity. The average American household is swimming in around 300,000 items. It’s so bad that a shocking 1 in 10 of us rents offsite storage just to handle the overflow. That fact alone shows how easily stuff can take over. When you’re in a studio, intentional decluttering is the single most powerful thing you can do to make your space feel open and livable.
Adopt Practical Decluttering Methods
Forget trying to overhaul your entire apartment in one frantic weekend. That’s a recipe for burnout. The real secret to staying organized is building small, consistent habits that stop the clutter before it even starts.
Let’s get started with two concepts I swear by:
- The ‘One-In, One-Out’ Rule: Make this your new mantra for everything from clothes and books to kitchen gadgets. When something new comes in, something similar has to go out. It’s a simple trade-off that keeps your closet from exploding and your shelves from groaning.
- The ‘Container Concept’: Give every category of item a designated home—a specific drawer, a particular basket, or a single shelf. Once that container is full, that’s it. You can’t add anything else until you’ve taken something out. This forces you to be honest about what you really need and stops those “just in case” items from staging a takeover.
Ask the Right Questions
When you’re sorting through your belongings, you need to go deeper than the classic “does it spark joy?” question. In a studio, every single item has to earn its keep.
The goal isn’t just to own less; it’s to make sure that everything you do own serves a clear purpose, supports the life you want to live, and makes your daily routine easier.
Pick up an item and get real with yourself. Ask these questions:
- Does this support the life I want in this space? Is that bulky exercise bike you never ride really contributing to your goal of a calm, open living area?
- Could another item I own do this job? Let’s be honest, do you need three different can openers or five nearly identical black t-shirts?
- Is the ‘just in case’ scenario realistic? Holding onto something for a rare, hypothetical event isn’t worth sacrificing the space you use every single day.
Letting go of things that don’t pass the test is incredibly freeing. You’re literally creating the physical and mental space you need to build a home that works for you, not against you. And once your space is clear, keeping it that way becomes so much easier. To keep things tidy long-term, learn how to organize cleaning supplies for a clutter-free home so your maintenance tools don’t become part of the problem.
Create Functional Zones in Your Open Floor Plan

Let’s be honest, the biggest mental hurdle with a studio is the complete lack of walls. Your living room, bedroom, and kitchen all share the same four walls, which can quickly make the space feel chaotic and undefined.
The trick is to create the illusion of separation. You don’t need to call a contractor; you just need to use smart visual and physical cues to establish distinct zones for every activity. Think of it like choreographing a dance for your furniture—each piece has a role in defining an area and guiding how you move through the space.
Use Furniture as Room Dividers
You don’t need drywall to build a wall. A well-placed piece of furniture can neatly separate your sleeping area from your living space, giving you a sense of privacy and structure while adding valuable storage. It’s a classic small-space tactic for one simple reason: it works.
Here are a few of my go-to methods that go way beyond just plopping a sofa in the middle of the room:
- The Open-Backed Bookshelf: This is the undisputed champion of studio apartment organization. Placing a tall, open-backed bookshelf between your bed and sofa creates a strong visual divide. It gives your sleeping area a cozy, nook-like feel but—and this is key—it doesn’t block natural light, so the whole apartment stays bright and airy.
- The Slim Console Table: For a more subtle approach, a slim console table placed directly behind your sofa is a fantastic, low-profile option. It draws a clear line in the sand, signaling “this is where the living room ends.” Plus, the surface is perfect for a small workspace, a charging station, or a few decorative pieces.
- A Low Credenza or Dresser: If you’re desperate for more closed storage, a waist-high credenza or a long, low dresser can do the same job as a console table. It physically carves out the zone while giving you drawers to hide away clutter.
The best studio layouts always feel intentional. When you use furniture to create clear boundaries, you’re telling a story about how each part of the room should be used. That brings a powerful sense of calm and order to a small space.
Anchor Your Zones with Rugs
Never, ever underestimate the power of a good area rug. It’s one of the easiest and most effective ways to anchor a zone and make it feel like its own distinct room. It’s a simple visual cue that tells your brain, “This is the living area,” or “This is the dining nook.”
For example, a large rug placed under your sofa, coffee table, and an accent chair instantly pulls that living space together. It creates a cohesive, defined zone that feels completely separate from the rest of the apartment. Even a small, round rug under a tiny bistro table and two chairs is enough to carve out a dedicated dining spot.
Figuring out the perfect placement can take some trial and error. That’s why exploring different studio apartment layout ideas can spark some inspiration for how to use rugs and furniture to your best advantage. Experimenting with these concepts is how you’ll finally nail down a system that truly works for you and your lifestyle.
Choose Furniture That Does Double Duty
In a studio, every piece of furniture has to earn its keep. It can’t just sit there looking pretty; it needs to be a workhorse. Think of it this way: if an item only serves one purpose, it’s taking up valuable real estate that you just don’t have to spare. This is where you need to get clever and find pieces that are as functional as they are stylish.
This mindset is really the heart of smart, small-space living. There’s a growing movement toward micro-housing, which proves a home’s value isn’t about square footage—it’s about smart design. With the right multifunctional pieces, even a tiny studio can feel spacious and meet all your needs. You can find some fascinating insights on this design philosophy and how it’s shaping city life.
Think Beyond the Futon
When you hear “multifunctional,” your mind probably goes straight to a clunky futon from your college days. We’ve come a long way since then. Today’s options are incredibly sophisticated and can blend seamlessly into any decor. The trick is to pinpoint your biggest space-related frustrations and find furniture that directly solves them.
- The Lift-Top Coffee Table: This is a total game-changer for a studio. It looks like a normal coffee table, but the top lifts up and out, creating a perfect surface for dining or a surprisingly ergonomic desk for working from home. Just like that, you’ve eliminated the need for a separate dining table, which can easily gobble up 15-20 square feet.
- The Expandable Dining Table: Love having people over but can’t justify a full-sized dining table? Look for an expandable console. These sit discreetly against a wall as a slim entryway table, but they can unfold to comfortably seat four, or sometimes even six, guests.
- The Storage Ottoman: Don’t settle for a simple footrest. A chic ottoman with a hidden storage compartment is the ideal spot to hide away extra blankets, board games, or that yoga mat you swear you’ll use tomorrow. It’s a seat, a surface, and a storage unit all in one.
I once swapped my traditional bed frame and separate dresser for a captain’s bed with deep, built-in drawers. This single change freed up an entire wall in my studio, making the room feel instantly larger and less cluttered. It’s about making one piece of furniture do the job of two.
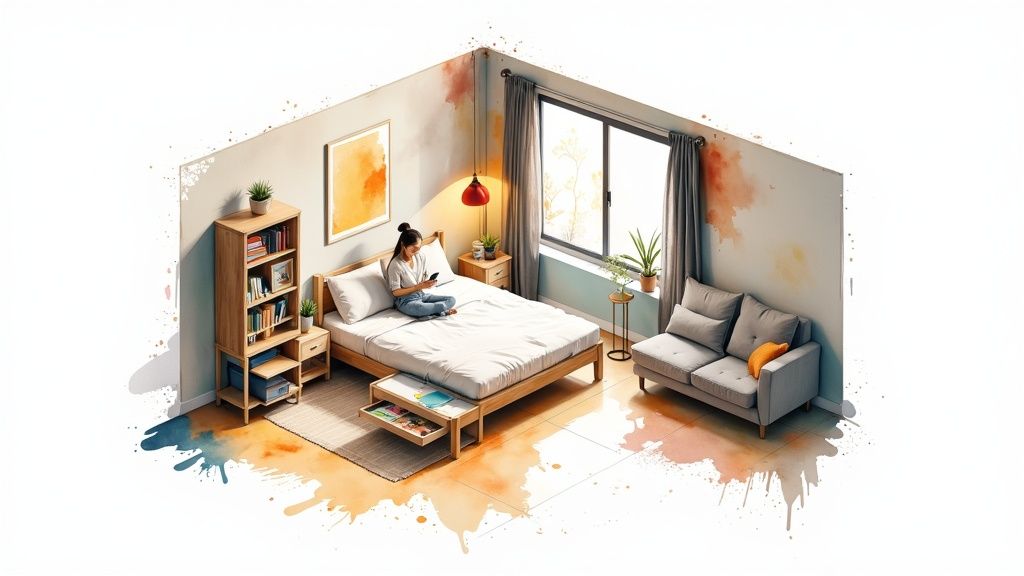
The image below shows how getting creative with vertical space, like adding floating shelves, frees up the floor for these essential multifunctional pieces.

As you can see, moving books and decor onto the walls keeps surfaces clear, making your studio feel more open and intentional.
How to Pick Pieces That Work Hard
To help you decide what’s worth the investment, I’ve put together a quick comparison of some of my favorite hard-working furniture items.
Essential Multifunctional Furniture Comparison
| Furniture Piece | Primary Use | Secondary Function | Best For |
|---|---|---|---|
| Lift-Top Coffee Table | Coffee Table | Dining Table, Desk | Eliminating the need for a separate dining area. |
| Captain’s Bed | Sleeping | Clothing Storage | Replacing a bulky dresser to save wall space. |
| Storage Ottoman | Footrest, Extra Seat | Hidden Storage | Stashing away clutter like blankets and remotes. |
| Nesting Tables | Side Table | Extra Surface Area | Flexible surfaces that can be spread out for guests. |
| Convertible Sofa | Seating | Guest Bed | Accommodating overnight guests without a spare room. |
When you’re out shopping, always ask yourself, “What problems does this piece solve for me?” A beautiful armchair is nice, but an armchair that swivels to face either the TV or your conversation area is much smarter. A sleek media console is good, but one with deep drawers to hide all the messy electronics and cables is way better.
The goal is to curate a collection of furniture that is constantly working for you. By choosing items that are both stylish and incredibly practical, you’re not just decorating; you’re engineering a highly efficient and comfortable home. Every smart choice adds up, turning a small studio from a challenge into a clever, well-organized sanctuary.
Unlock Hidden Storage Opportunities
Great storage is the secret weapon for anyone trying to figure out how to organize a small studio apartment. Your closet is just the beginning. The real game-changer is learning to spot the untapped potential hidden in plain sight all around you. It’s time to look up, down, and in-between to reclaim every last inch.
The most impactful strategy? Think vertically. When you can’t build out, you have to build up. Drawing the eye toward the ceiling not only creates an illusion of height but also unlocks a massive amount of storage real estate. Floor-to-ceiling shelving units are brilliant for this, turning an entire wall into a library for books, decorative bins, and even a few plants.
But you don’t need a huge, expensive unit to get the same effect. Installing a series of simple floating shelves works just as well. Stagger them up a wall to create a dynamic display that’s both practical and stylish.
Look for Unconventional Spaces
Beyond the walls, some of the best storage spots are the ones most people completely ignore. These are the little nooks and crannies that, with a bit of creativity, can become organizing powerhouses.
-
Under the Bed: This is prime real estate. Don’t let it become a haven for dust bunnies! Grab some sleek, low-profile storage containers with wheels. They’re perfect for stashing away seasonal clothing, extra bedding, or shoes you don’t wear every day.
-
The Skinny Spaces: Take a look at that awkward gap between your fridge and the wall, or the space next to your washing machine. A slim rolling cart can slide right into these forgotten slivers of space, creating an instant pantry for spices, oils, or cleaning supplies.
-
Behind the Doors: The back of every single door is a blank canvas just waiting to be used. An over-the-door organizer with clear pockets is fantastic for everything from shoes and accessories to toiletries and craft supplies.
My favorite personal trick is using the side of my refrigerator. A strong magnetic spice rack or a magnetic paper towel holder frees up so much precious counter and drawer space in my tiny kitchen. It’s a simple, cheap hack that makes a huge difference.
Make Every Surface Work Harder
Once you’ve maxed out your vertical and hidden spaces, it’s time to look at the items you already have. Many everyday objects can be tweaked to pull double duty for storage, which helps cut down on the clutter that inevitably piles up on your main surfaces.
For instance, that bulky knife block eating up counter space? Ditch it for a sleek magnetic knife strip on the wall. You can also add small, stick-on shelves to the inside of your kitchen cabinet doors to hold things like spice jars or measuring spoons. These tiny adjustments really add up, clearing your surfaces and making your studio feel significantly more open.
Thinking creatively about storage is how you conquer clutter for good. By combining vertical solutions, finding those unconventional nooks, and making your existing items work harder, you build a system that keeps your studio feeling spacious and effortlessly tidy. It’s all about seeing the potential where others just see limitations.
See It All Come Together with RoomGenius AI
So you’ve decluttered and have a few layout ideas bouncing around in your head. But now comes the hard part: will that loft bed actually work in your space? Is that bookshelf divider going to look as chic in real life as it does on Pinterest? This is where the planning rubber meets the road. Let’s be honest, nobody wants to spend an afternoon dragging heavy furniture around just to see if an idea works.
There’s a much smarter way to do this. You can see exactly what your organized studio will look like before you even think about moving anything.
Test Drive Your Layouts, Minus the Sweat
This is where a tool like RoomGenius AI becomes your secret weapon. Think of it as your personal design playground. You just snap a picture of your room, pop in the dimensions, and it will generate a whole host of different layout options for you to explore. It’s the perfect way to experiment with zoning strategies without breaking your back.
Here’s a peek at what that looks like inside the tool. You get to see several distinct design possibilities for the exact same space.
Being able to see different arrangements side-by-side is a game-changer. It helps you quickly spot the layout that makes the most sense for your apartment’s specific quirks and dimensions.
I can’t stress this enough: visualizing your layout first is the single best way to avoid expensive or frustrating mistakes. It confirms whether your furniture will fit, but more importantly, if it will create the kind of flow you can actually live with every day.
This digital approach helps you answer all those nagging questions with clarity:
- Can my desk really fit by the window without making the walkway too tight?
- Will that open-backed bookshelf give me enough privacy for a sleeping nook, or will it just look cluttered?
- How much open floor space am I actually left with if I go for that slightly bigger sofa?
By running through these what-ifs digitally, you can fine-tune your plan until it’s perfect. If you’re curious about the tech behind it, you can learn more about how an AI interior design tool can take your rough ideas and turn them into a solid, visual blueprint.
Tackling Your Toughest Studio Questions
When you’re dealing with a small studio, a lot of the same questions tend to pop up. Let’s get right into some of the most common ones I hear and provide some practical answers.
How Do I Stop My Studio from Feeling So Cramped?
The key here is playing with perception. You want to trick the eye into seeing more space than is actually there. It all starts with light and clear lines of sight.
Painting your walls a light color is a great first step, but the real magic happens with your furniture choices. Instead of a heavy, solid sofa that sits flat on the floor, look for pieces with visible legs. Think mid-century modern styles. This creates a sense of openness because you can see the floor underneath, making the room feel airier.
Another classic pro tip? Hang a big mirror. Place it on a wall opposite a window. It will bounce natural light all over the room and create a real illusion of depth.
What are the Biggest Organizing Mistakes People Make?
I see two mistakes more than any others: buying bulky, single-use furniture and completely ignoring the walls. That massive couch might be comfortable, but it’s eating up your entire living area. And if your walls are bare, you’re wasting your most valuable real estate.
Another huge pitfall is the “surface clutter” trap—when every tabletop, counter, and chair becomes a drop zone for random stuff.
The only way to win the long game in a studio is to give every single thing you own a specific home. If it doesn’t have a spot, it becomes clutter. It’s a simple habit, but without it, even the most perfect organization system will fail.
Remember, your walls are your best friends. Floating shelves, wall-mounted desks, and tall, skinny bookcases are non-negotiable. They draw the eye upward and get things off the floor, which instantly makes a space feel bigger.
Tired of just thinking about it? It’s time to actually see what your studio could look like. With RoomGenius, you can snap a photo of your current setup and get stunning, practical design ideas back in seconds. Give it a try and start building a space you love at https://www.room-genius.com.